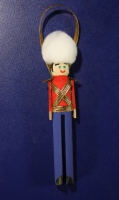
 I learned to make these ornaments from my husband’s grandmother. They’re so simple to put together, and they’re one of those things that always makes me think of the winter holidays. They make great gifts, stocking stuffers, or are a nice touch when tied to a bigger package.
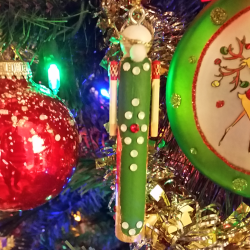
Update: I have made hundreds more of these ornaments since I originally posted this article. I’ll include photos at the bottom of this article for a inspiration!
Items You’ll Need To Make One Toy Soldier Ornament (and some helpful hints)
- 1 Vintage Style Clothespin
- 1 Popsicle Stick
- 1″ Pom Pom
- Scissors
- Exacto Knife (or just use your scissors, if the popsicle stick is thin enough and your scissors are strong enough.)
- Fine Sandpaper
- Glue – We recommend The Ultimate! water based super glue for this project.
- Acrylic Paint for coat and pants. I used Red and Blue.
 I’ve made hundreds of these ornaments. I can attest to the whole “You get what you pay for” school of thought. I started my last large lot of ornaments with the cheaper paint shown in this photo, and they all stuck together even after a week of drying on their own. That’s when I switched to the better stuff. If you can, buy the better quality paints, such the Liquitex Heavy series of tube paints. It will need fewer coats, and because it’s thicker, you’ll have less trouble with the wood grain lifting up.
 - Acrylic Paint Pens: black, red, blue and/or green (you can also use regular paint and a fine paint brush, but I find it easier and faster to make the face details with a paint pen)
- 1/8″ Gold Metallic Ribbon or Braid (for the chest and waist bands, and to make a loop to hang the ornament up with)
- 3/8″ Gold Trim (for the shoulder braids)
- Paint brush
Optional:

- Sculpey Matte Glaze to seal the head before you paint the face. The paint bled into the wood on some of the clothespins I made, leaving them to look like the stuff of nightmares, and I had to sand it off and seal it. Now I always seal the head before I paint the face on. The ornaments in the video below were not sealed, however.
- Screw eye to attach the hanger to the head. (The other option shown in the examples is to glue the hanger to the back of the ornament.)
- Flat back crystals to use as buttons on the coat instead of just the gold trim.
- Clear Coat Acrylic Spray
Round Stands or styrofoam egg cartons: These are very useful for standing up your soldier as he dries. There are round wood stands that hold clothespins upright and are usually sold near the clothespins in a craft store. My problem with them is that if you bump the table you’re working on, they tend to fall over, but you can use those same stands to display the ornament if you don’t want to hang it up. Another option is to use a styrofoam egg carton with slits in the bottom. Make sure it’s styrofoam! I tried the paper cartons, and the fibers stuck to my paint job. If you can’t find styrofoam cartons, you can find gently used ones on Ebay.
Directions
Cut The Arms, Prep The Body
Cut the popsicle stick to about 1″ long. Divide it in half again lengthwise. Sand the wood on the arms and body if it’s a little jaggy.
Painting Your Toy Soldier
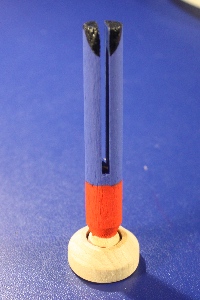
First, paint the legs. Using the blue paint, paint from just above the split in the clothespin down to the bottom, making sure to cover the very bottom and between the clothespin prongs. Next, paint the area above the blue to the “neck” in red. You might need to give everything a second coat of paint before proceeding further.

Now it’s time to paint the face! I tend to keep my faces very simple – you can do more if you feel so compelled. Otherwise, I simply put a smiley face with eyebrows on my soldiers. Two green or blue eyes, a red mouth, and eyebrows that match the hair. For the hair I pretty much use a Lego-style haircut on him. I give him long sideburns that define where the ears would be, and then trace around the ear area, filling in the back and top of the head. You don’t have to get too detailed on the top of the head though because the pom pom “hat” will be glued up there.
Glue The Parts Together
I’d like to take a moment to say why I think hot glue is not a good idea for this project. This is a Christmas ornament and will probably be packed away into hot attics and storage units during the rest of the year. We’ve used hot glue on projects like this before only to find the next winter season that the hot glue shifted and reset itself, often resulting in lost limbs and pieces! So I recommend a water based super glue for this project. It dries fairly quickly and holds the pieces together really well.
Before you glue the arms on, you need to glue the trim. Beginning on the side at the waist, apply a small dot of glue and the end of the 1/8″ gold braid. Loop it up and around the neck, and down to the opposite side at the waist. Cut the braid and glue that end down also. This will create a criss-cross on the front of the soldier. Next cut a piece for the belt, applying dots of glue along the waist, and securing the braid down.
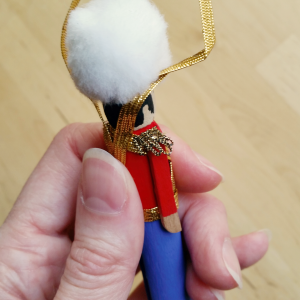
Now apply a line of glue on each side where the arms will go. Be sure to cover the braid as well with glue; wherever the arm will be resting. These things pop off easily so it’s best to glue them down as securely, but neatly, as possible. Now glue the pom pom to the top of his head*. I’ve found with the pom poms I purchased, they aren’t entirely round but tend to have flat sides. I use those flat sides as the sides of the hat. It seems to give it a more vertical appearance, like European or marching band Shako caps. Now cut a short piece of the 3/8″ metallic trim, about 3/8″ wide. This will be the shoulder braid. Carefully glue it to each shoulder.
The Hanging Loop
In the video, I cut 6″ of the 1/8″ braid and glued a loop to the back of the soldier.
*Another option is to put a screw eye on the head before you put the pom pom on and then attach the pom pom. I put mine on at an angle so that it pokes out just behind the pom pom.

Here is an ornament I made with a clothespin that didn’t have a center cut for the legs and flat back Swarovski crystals. Though this clothespin was actually a “reject”, you can purchase similarly cut wooden pins like this.
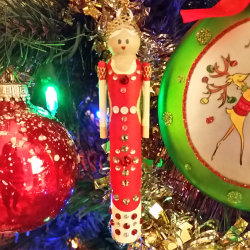
I used some wireform by Amaco, which I spray painted gold, for the crown and sleeve detail.
Here’s a video showing the assembly process: